
Learn Manual Camera Settings for Photography
If you’ve ever switched your camera into manual mode and instantly felt overwhelmed, you’re definitely not alone. Learning manual settings can seem complicated at first, but once you understand the basics of exposure and how your camera works, photography becomes so much more creative and rewarding. Many beginner photographers start by learning the “exposure triangle,” which includes aperture, shutter speed, and ISO — the three settings that control how bright or dark your image appears.
What Is Manual Mode?
Manual mode gives photographers full control over their camera settings instead of allowing the camera to make decisions automatically. This means you choose your shutter speed, aperture, and ISO based on the lighting and the look you want to create. While auto mode is convenient, manual mode helps photographers better understand light, movement, and depth in their images.
Understanding the Exposure Triangle
The exposure triangle is the foundation of photography. Each setting affects your image differently, and learning how they work together is key to mastering manual mode.
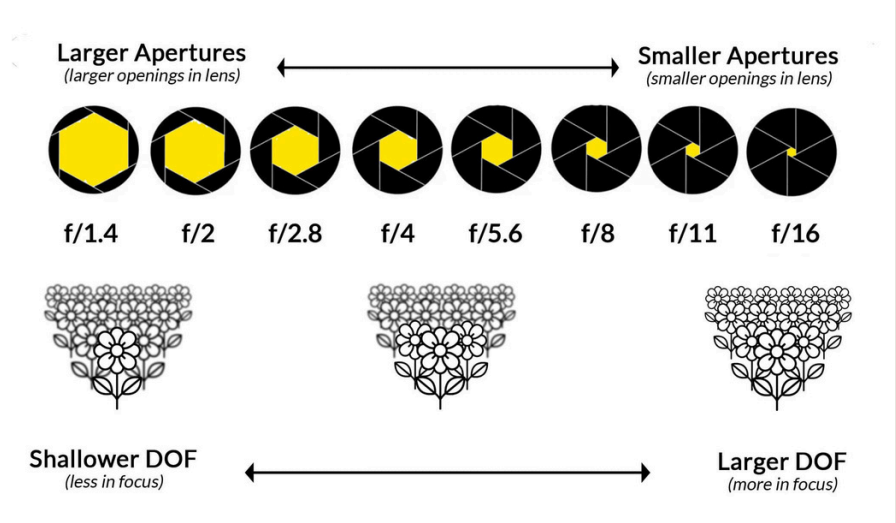
Aperture
Aperture controls how much light enters your lens and also affects depth of field. Lower f-stop numbers like f/1.8 create a blurry background and are perfect for portraits, while higher numbers like f/8 or f/11 keep more of the image in focus for landscapes.

Shutter Speed
Shutter speed controls how long your camera sensor is exposed to light. Faster shutter speeds freeze motion, making them ideal for sports or action photography, while slower shutter speeds create motion blur and allow more light into your camera.
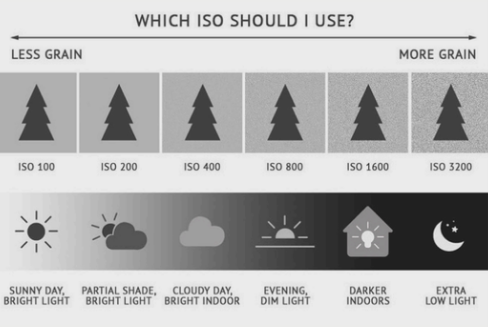
ISO
ISO controls your camera sensor’s sensitivity to light. Lower ISO settings create cleaner images with less grain, while higher ISO settings help in darker environments but can introduce noise into your photos.
Why Learning Manual Mode Matters
Shooting in manual mode gives photographers creative freedom and consistency. Instead of your camera changing settings for every shot, you stay in control of how your photos look. Many photographers recommend learning manual settings early because it helps you understand how lighting affects your images and improves confidence behind the camera.
Even experienced photographers don’t always shoot fully manual, but understanding these settings makes it easier to adapt in difficult lighting situations or create a specific artistic style.
Tips for Beginners Learning Manual Settings
Start practicing in consistent lighting before moving into harder environments.
Learn one setting at a time instead of changing everything at once.
Use your camera’s light meter to help balance exposure.
Practice often and review your settings after every shoot.
Don’t be afraid to make mistakes — experimenting is one of the fastest ways to improve.

Final Thoughts
Learning manual settings may feel intimidating at first, but it’s one of the most valuable skills a photographer can develop. Once you understand how aperture, shutter speed, and ISO work together, you’ll have much more control over your images and your creative style. Photography is all about practice, patience, and experimenting with light — and manual mode is where many photographers truly begin to grow.
If you enjoyed this blog post and want to learn even more about shooting in manual mode, I highly recommend downloading my free photography guide designed to help photographers better understand manual camera settings. The guide also includes a helpful cheat sheet and tips for troubleshooting common photography issues, making it a great resource for beginners and photographers wanting to grow their skills. Thank you so much for reading, and I hope this guide helps you feel more confident behind the camera!
For more insights, check out my website at abigailrodriguezphotography.com and connect with us on Instagram, Facebook, YouTube, and TikTok. Happy shooting!